
-p-2000.png)


How to Convert Figma to Webflow [A Step by Step Guide]

Figma is a great design tool for creating stunning visual designs, but when it comes to turning those designs into functioning websites, you need Webflow. Webflow is a powerful web design platform that lets you turn your Figma designs into responsive websites with ease. But exporting Figma designs to Webflow can be challenging if you haven’t considered pre-setting your styles in Figma.
Regardless of the challenges, both Webflow and Figma are amazing design tools, offering numerous benefits.
With that said, in this article, we will show you how to convert Figma designs to Webflow with ease. Let's dive in!
1. Create A New Project In Webflow
Firstly, create a new project using Webflow. All you have to do is go to the top right corner and click on the blue button to get started with your project. Use a new folder for this new project – just to keep things tidy.
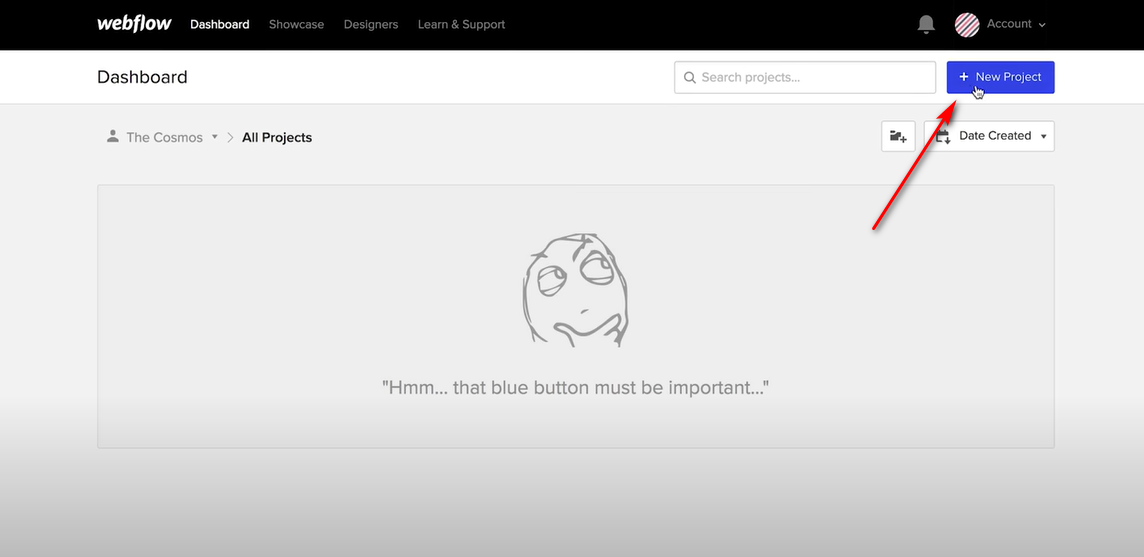
Figma also utilizes a similar structure when creating projects, which will come in handy during the conversion process.
2. Define Your Style Guide
One of the recommended ways to proceed with your site is by creating your global styles.
What are the global styles?
All the default elements, such as headings, paragraph styles, and link appearances, that are featured on a website comprise global styles. Factor in this step if your Figma project doesn’t have global styles defined.
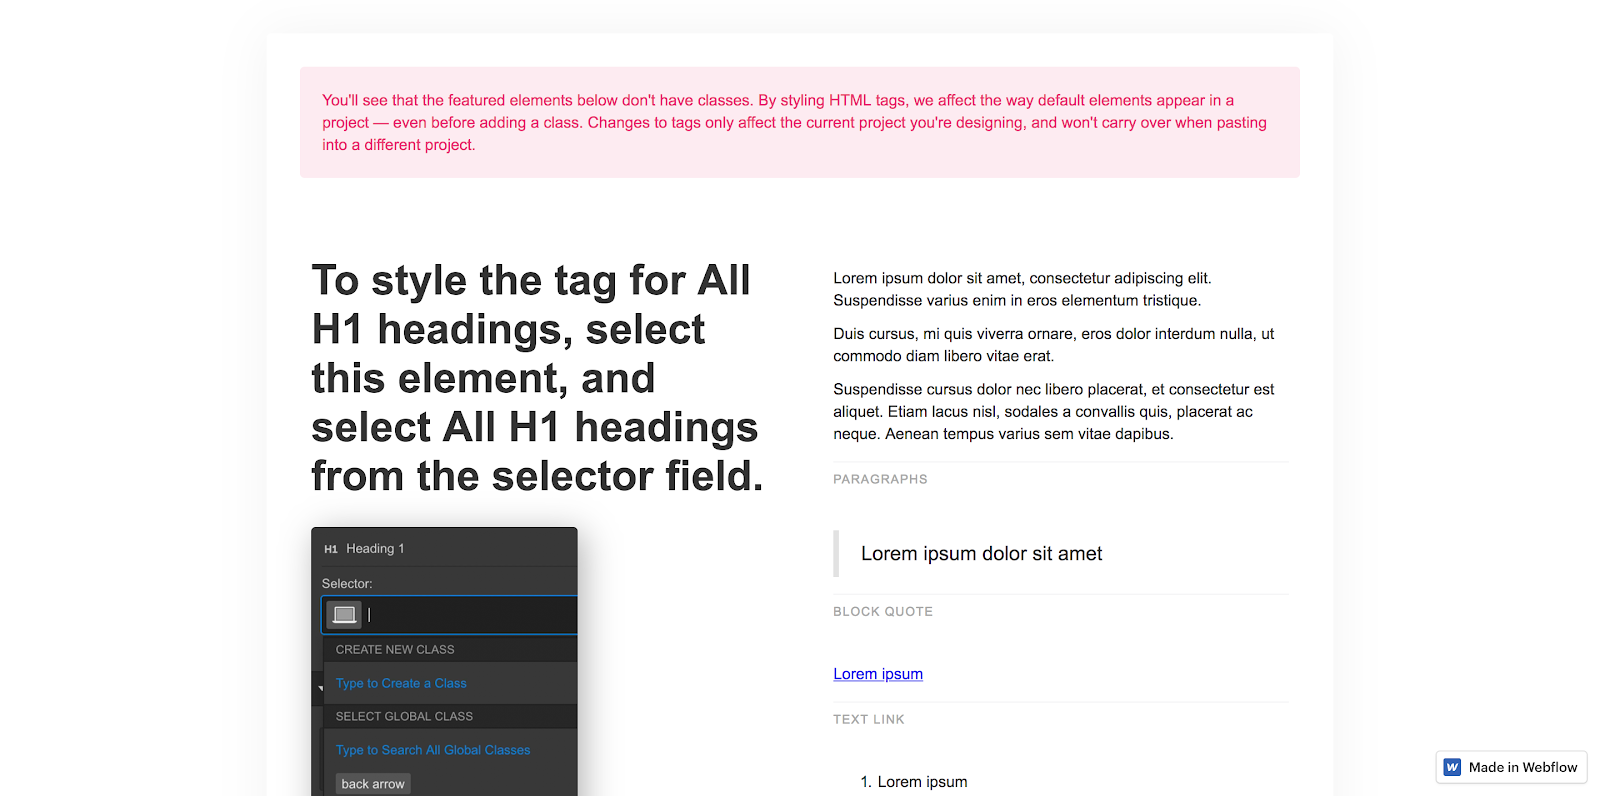
To set up your style guide, you need to clone the base style guide or HTML tag template provided here.
Within your project folder, create a new page to paste the copied or cloned style guide from earlier. (When you clone the site using the above link, you will be directed to a project canvas, from where you will have to copy the essential elements to your new site).
3. Implement Custom Colors
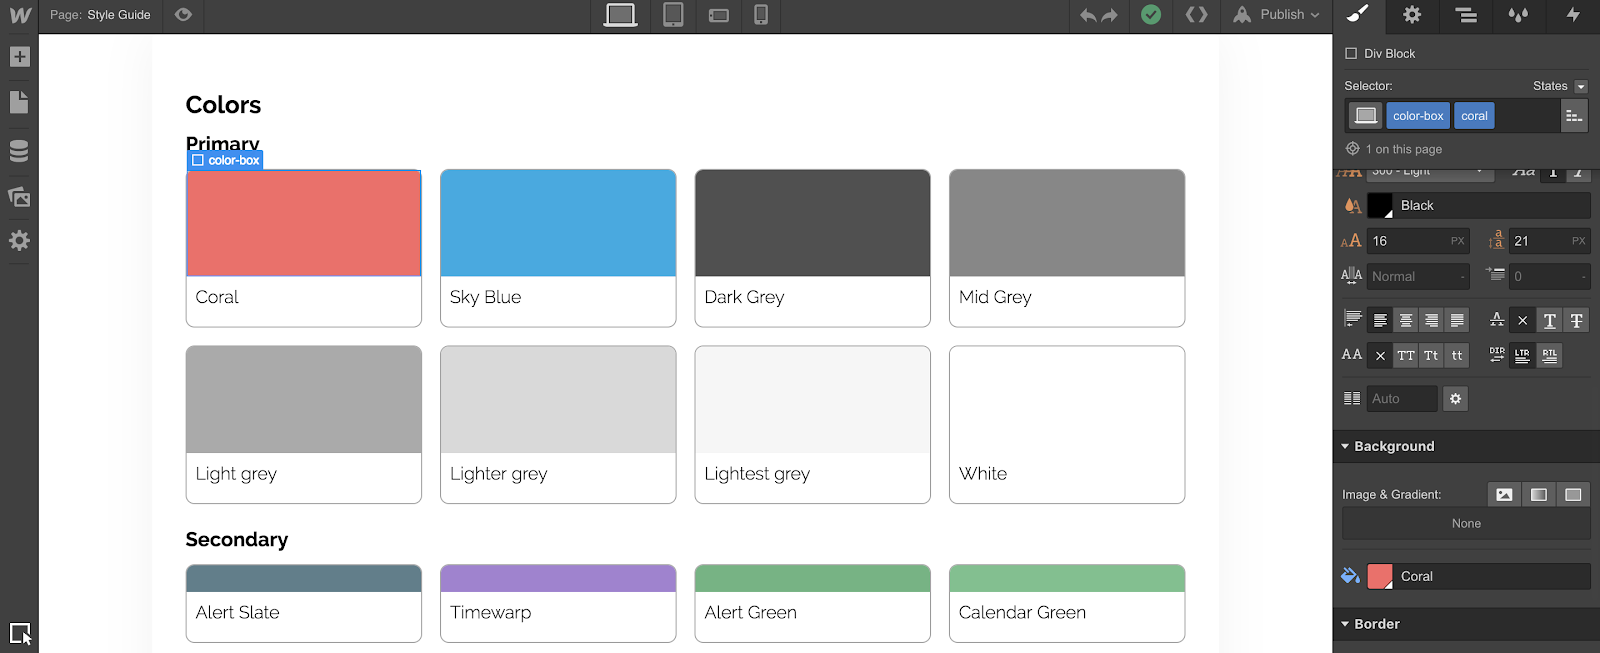
Next, you need to introduce custom colors and declare them global.
If you’d be using too many colors, the best way to go about it is by adding a color-block div.
After that, keep changing its color repeatedly until all your swatches are created in Webflow.
4. Export Assets from Figma
Now that the initial steps in Webflow are complete, you can start exporting your Figma assets. Ensure that you highlight all elements that you need for export during the design phase. This will make exporting easier.
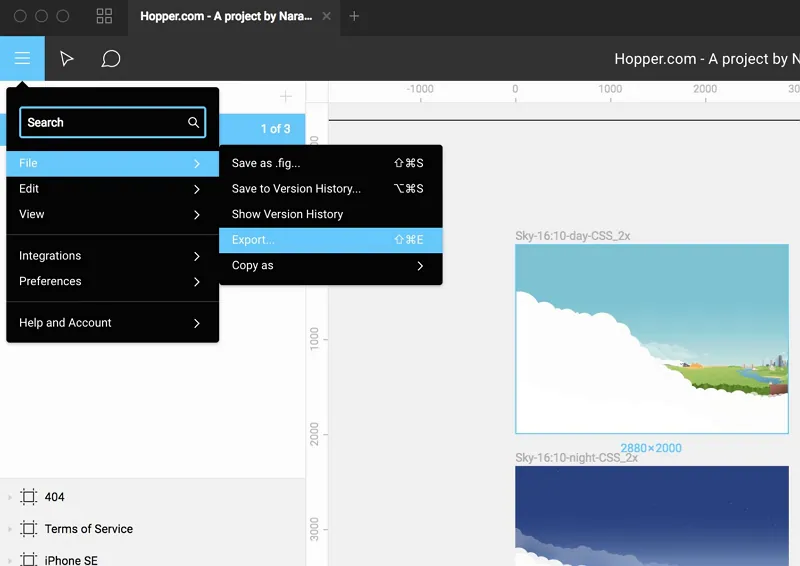
If you need to export everything, you do not need to select any frames.
If you need a specific frame, select only that frame for exporting.
When using Windows, hit Control+Shift+E, and hit Command+Shift+E for Mac to open the Export dialog.
Again, hit Export to locate them using Finder or Explorer. Next, you need to drag these into the Webflow window. Otherwise, from the assets' panel, you can use the Upload button and drag the frames directly from Webflow.
New subfolders will be automatically introduced in Webflow if your Figma project layers come with forward slashes, for example, icon/back.
5. Replacing Frames and Groups With Divs
So how do you organize everything?
The answer is Divs.
Using divs, you can replicate the frames and groups from the files (of the Figma project).
For organizing things further, you can add a container to each div and assign a class name. Here, you do not need to define the class. Following these steps will make it easy to add anchor links if required.
6. Style Your Content
This step might appear to be complex. However, if you assign generic names to your classes and use a combination of different aspects, everything will fall into place swiftly.
Rather than using a name, such as Black Hero Text, it is recommended that you create a combo class. For instance, try something like "All H1 Headings + Black Text" that includes the size, weight, and positioning, irrespective of the color.
7. Create Interactions
When using Figma, the prototypes are flat, making it difficult to translate complex interactions to the web in Webflow. However, you have an option to do these interactions from Webflow by defining them on a per-class basis. You also have the option of creating new ones, encompassing multiple elements or classes.
8. Go Mobile
When using Webflow, it is recommended that you start by designing the mobile breakpoints before the desktop.
In Webflow, components behave like those in Figma. You do not have the option of overwriting a master from within the instance. However, you can start by defining a master component. Its attributes will be directed to all component instances, which you can override.
9. Publish & Tweak
Finally, you can push your design live. If you need, you can tweak your design according to the devices on which it will be viewed. Before going live, test your design on multiple devices to ensure that the business logic and design flow are taken care of, regardless of the interface.
Summary
Figma is a great design tool for creating high-fidelity designs, but it can be difficult to convert those designs into code for someone who is not familiar with Figma. Follow the steps in this article to quickly and easily convert your Figma designs to Webflow.
Need further assistance?
Reach out us, and we'll be happy to help you out!
Also Read:
How to Add Custom CSS and JavaScript Code In Webflow
Is Webflow Good For Developers?
How to Create a Multilingual Website in Webflow
About Seattle New Media
We’re a Certified Webflow Agency specializing in Webflow design and development. We have designed and developed numerous websites in Webflow for our clients worldwide. Contact us today for a free consultation!

FAQ

Editorial Team
Publisher

Editorial Team
Publisher
Subscribe to Seattle New Media Newsletter

Enter your details to get instant access
Get the File Now
If you'd like to download the file, enter your name and email below, and we'll send it directly to your inbox.
The file has been sent to your email. Please check your inbox!
Figma is a great design tool for creating stunning visual designs, but when it comes to turning those designs into functioning websites, you need Webflow. Webflow is a powerful web design platform that lets you turn your Figma designs into responsive websites with ease. But exporting Figma designs to Webflow can be challenging if you haven’t considered pre-setting your styles in Figma.
Regardless of the challenges, both Webflow and Figma are amazing design tools, offering numerous benefits.
With that said, in this article, we will show you how to convert Figma designs to Webflow with ease. Let's dive in!
1. Create A New Project In Webflow
Firstly, create a new project using Webflow. All you have to do is go to the top right corner and click on the blue button to get started with your project. Use a new folder for this new project – just to keep things tidy.
Figma also utilizes a similar structure when creating projects, which will come in handy during the conversion process.
2. Define Your Style Guide
One of the recommended ways to proceed with your site is by creating your global styles.
What are the global styles?
All the default elements, such as headings, paragraph styles, and link appearances, that are featured on a website comprise global styles. Factor in this step if your Figma project doesn’t have global styles defined.
To set up your style guide, you need to clone the base style guide or HTML tag template provided here.
Within your project folder, create a new page to paste the copied or cloned style guide from earlier. (When you clone the site using the above link, you will be directed to a project canvas, from where you will have to copy the essential elements to your new site).
3. Implement Custom Colors
Next, you need to introduce custom colors and declare them global.
If you’d be using too many colors, the best way to go about it is by adding a color-block div.
After that, keep changing its color repeatedly until all your swatches are created in Webflow.
4. Export Assets from Figma
Now that the initial steps in Webflow are complete, you can start exporting your Figma assets. Ensure that you highlight all elements that you need for export during the design phase. This will make exporting easier.
If you need to export everything, you do not need to select any frames.
If you need a specific frame, select only that frame for exporting.
When using Windows, hit Control+Shift+E, and hit Command+Shift+E for Mac to open the Export dialog.
Again, hit Export to locate them using Finder or Explorer. Next, you need to drag these into the Webflow window. Otherwise, from the assets' panel, you can use the Upload button and drag the frames directly from Webflow.
New subfolders will be automatically introduced in Webflow if your Figma project layers come with forward slashes, for example, icon/back.
5. Replacing Frames and Groups With Divs
So how do you organize everything?
The answer is Divs.
Using divs, you can replicate the frames and groups from the files (of the Figma project).
For organizing things further, you can add a container to each div and assign a class name. Here, you do not need to define the class. Following these steps will make it easy to add anchor links if required.
6. Style Your Content
This step might appear to be complex. However, if you assign generic names to your classes and use a combination of different aspects, everything will fall into place swiftly.
Rather than using a name, such as Black Hero Text, it is recommended that you create a combo class. For instance, try something like "All H1 Headings + Black Text" that includes the size, weight, and positioning, irrespective of the color.
7. Create Interactions
When using Figma, the prototypes are flat, making it difficult to translate complex interactions to the web in Webflow. However, you have an option to do these interactions from Webflow by defining them on a per-class basis. You also have the option of creating new ones, encompassing multiple elements or classes.
8. Go Mobile
When using Webflow, it is recommended that you start by designing the mobile breakpoints before the desktop.
In Webflow, components behave like those in Figma. You do not have the option of overwriting a master from within the instance. However, you can start by defining a master component. Its attributes will be directed to all component instances, which you can override.
9. Publish & Tweak
Finally, you can push your design live. If you need, you can tweak your design according to the devices on which it will be viewed. Before going live, test your design on multiple devices to ensure that the business logic and design flow are taken care of, regardless of the interface.
Summary
Figma is a great design tool for creating high-fidelity designs, but it can be difficult to convert those designs into code for someone who is not familiar with Figma. Follow the steps in this article to quickly and easily convert your Figma designs to Webflow.
Need further assistance?
Reach out us, and we'll be happy to help you out!
Also Read:
How to Add Custom CSS and JavaScript Code In Webflow
Is Webflow Good For Developers?
How to Create a Multilingual Website in Webflow
About Seattle New Media
We’re a Certified Webflow Agency specializing in Webflow design and development. We have designed and developed numerous websites in Webflow for our clients worldwide. Contact us today for a free consultation!
FAQ
Editorial Team
Publisher
Subscribe to Seattle New Media Newsletter
Editorial Team
Publisher
Get the File Now
If you'd like to download the file, enter your name and email below, and we'll send it directly to your inbox.
The file has been sent to your email. Please check your inbox!


Hi, I'm Mike!
If you are enjoying the article, feel free to subscribe to our monthly newsletter.
If you have any project requirements, please contact us.


