
-p-2000.png)


How to Create Airtable Forms: A 6-Step Guide

Having a contact form on your website or a feedback form sent via email can be valuable for your business to gather crucial information from customers and employees. However, to make the most of this information, it is essential to organize the data in a way that is easily accessible and lucid.
Airtable Forms is a great tool to achieve this. It is intuitive, user-friendly, and can refine how you use forms. In this article, we understand Airtable forms and how you can create them.
What are Airtable Forms?
Airtable Forms helps you collect information from individuals through polls, surveys, application forms, feedback forms, and event RSVPs. It creates a structured system to collect consistent data from anyone. It enables you to derive conclusive inferences and action items.
You can customize these forms to meet your requirements and change their style to align with your brand. These forms integrate seamlessly into your workflow and automatically populate data on any base. They have a responsive design, making them accessible from any device.
How to Create Airtable Forms?
Airtable forms help sales, marketing, and even the human resource department. It helps collect quality information and drive decision-making. Here are the steps you can follow to create an Airtable form:
Step 1: Create a form
To create a form in Airtable, begin with a table to populate the collected data. You can make the table from scratch or import it from Google Sheets or elsewhere. Expand the view sidebar and select Form + under Create a View.

Forms on Airtable are automatically created based on the fields added to the table. Ensure you match rich field types to the information you want to collect. For example, capture names with text fields or images with attachment fields. You can also add additional fields using + Add a Field in the form builder.
Step 2: Customize your form
Airtable allows you to customize everything from the appearance of the form to conditional form fields. Keep the form simple, clear, and easy to navigate to ensure individuals can fill it.
Here are some of the customization actions that you can use while structuring the form:
- Custom field names: Make the form more engaging by updating the field header with a question or statement that is easy to comprehend.
- Conditional form fields: Toggle on the Show field only when conditions are met to display information based on the answers submitted by an individual.
- Required fields: Ensure individuals fill crucial fields by enabling the toggle next to Required in the upper right corner. A red asterisk ensures individuals fill these fields before submitting the form.
- Rearrange form fields: Change the order in which the form field appears by selecting the drag handle next to the field name and moving it above or below other fields.
- Hide a field: Remove irrelevant fields from the form by clicking the field name and dragging it to the left of the screen.
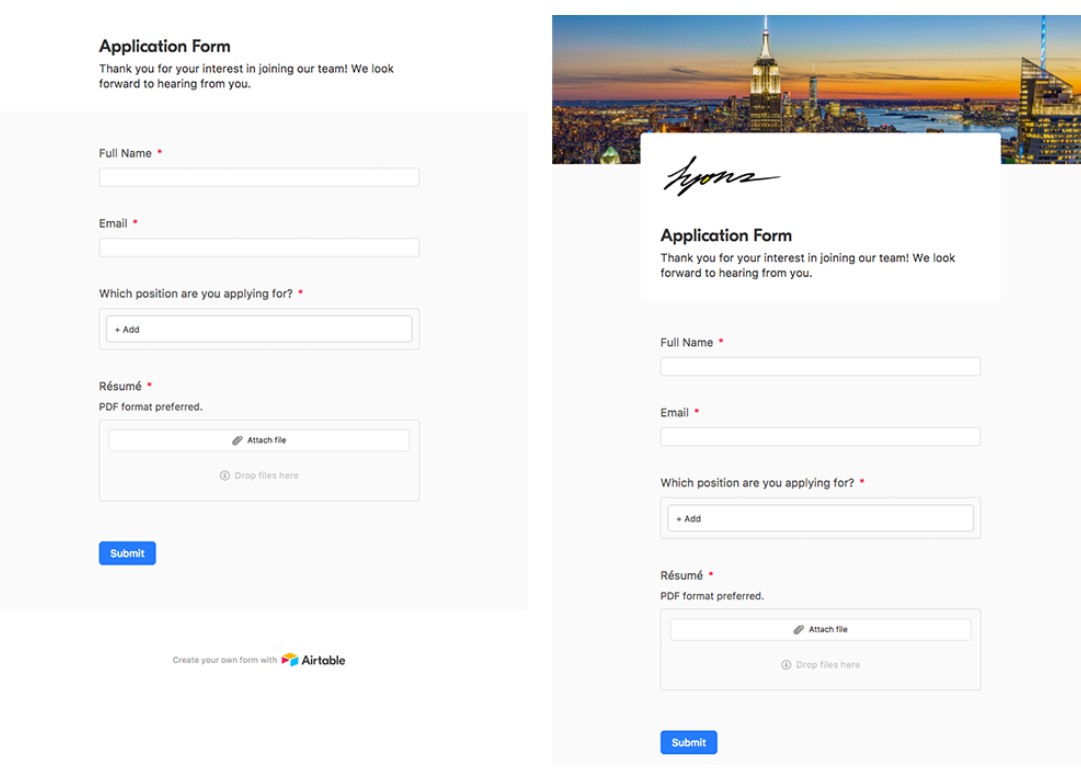
Airtable allows you to add your brand identity to the form. Click anywhere in the header next to Add a cover image, and upload a desired image. You can also add your brand logo by selecting Add a logo and uploading the image to the dialog box.
Step 3: Customize post-submission settings
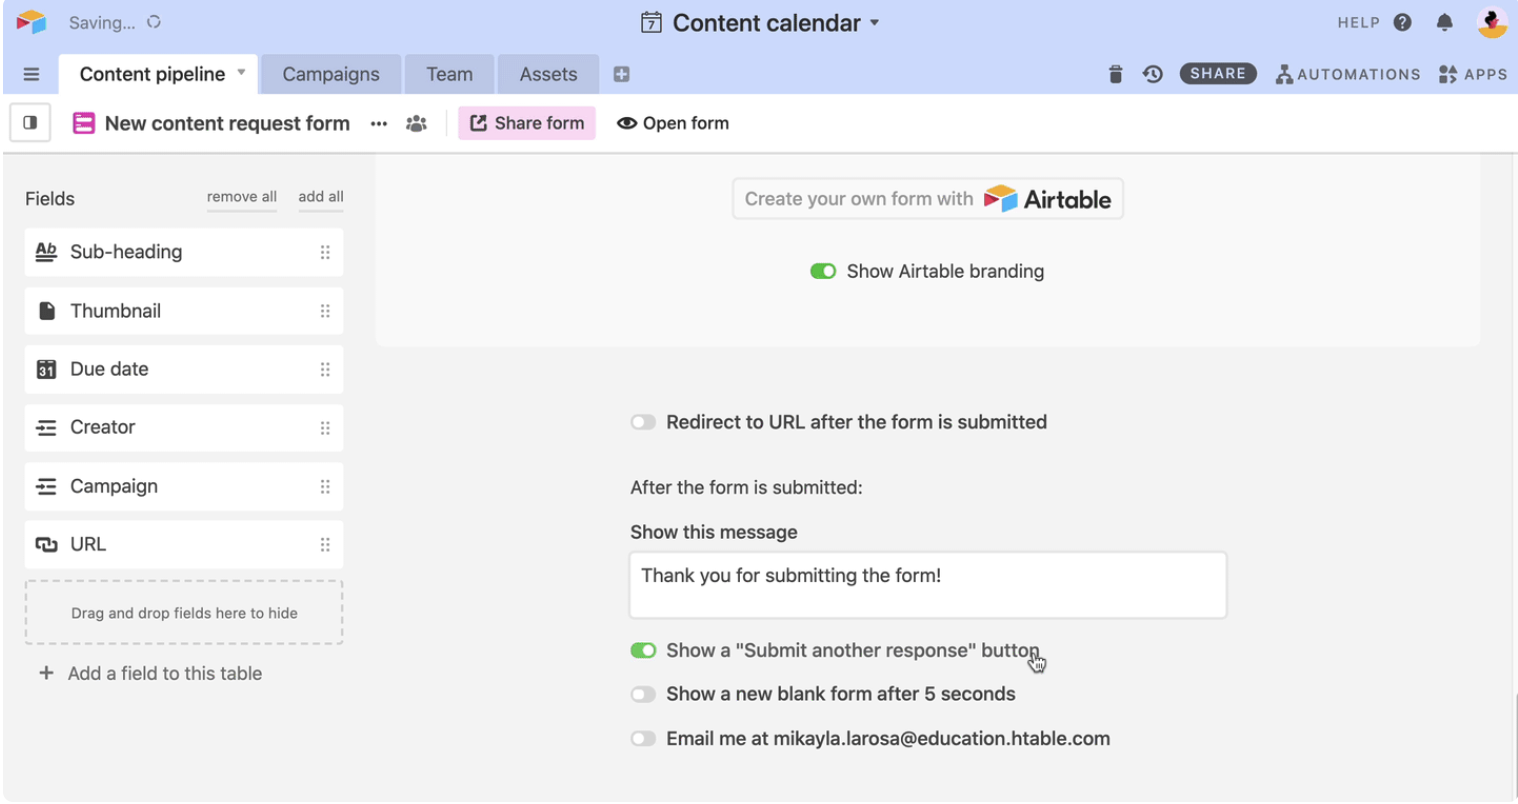
Once an individual submits a form, you can customize their experience. You can configure the form to display a custom message or redirect them to a custom URL. Moreover, you can set up an email notification to your inbox after every form submission. Navigate to the bottom of the form and toggle on the action to meet your requirements.
Step 4: Test the form
Before you send out your form to the desired target audience, ensure it functions properly. Navigate to the Open form in the upper left corner to view it as any individual would. Test the various fields and ensure that any conditional form fields respond correctly.
Step 5: Share the form
Once you create and test the form, it is time to share it with your target audience. You could use it for external surveys or circulate it internally to understand employee sentiments.
Navigate to the view bar and select Share form from the top left corner. It generates a unique URL that you can copy and send to anyone.
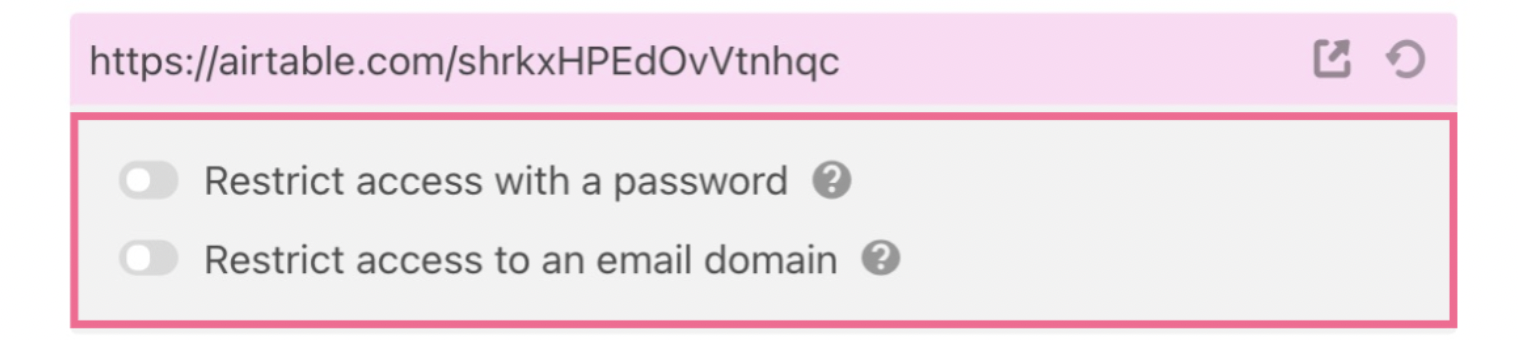
If your form contains sensitive information, a Pro or Enterprise Airtable plan allows you to add a password or set access to a specific email domain. It adds an extra layer of protection that ensures the information you collect is from the appropriate source and is confidential.
Step 6: Organize and review submissions
Any time an individual fills out a form, their details appear on the table in real time. Take immediate action on the forms by updating their status field or using a filtered view for specific submissions.
Final word
Airtable is a powerful tool that simplifies collecting, storing, and retrieving information. The form view helps in the systematic management of assets and gathering information. Moreover, these forms can be easily embedded into your website, enhancing their accessibility.
Creating complex Airtable forms with multiple sections and conditional fields may seem daunting. Luckily, we specialize in it and can help you set it up in no time. Drop us a message to get started.

We're here to help!
Get in touchWe're here to help!
Get in touchFAQ

Editorial Team
Publisher

Editorial Team
Publisher
Subscribe to Seattle New Media Newsletter

Enter your details to get instant access
Get the File Now
If you'd like to download the file, enter your name and email below, and we'll send it directly to your inbox.
The file has been sent to your email. Please check your inbox!
Having a contact form on your website or a feedback form sent via email can be valuable for your business to gather crucial information from customers and employees. However, to make the most of this information, it is essential to organize the data in a way that is easily accessible and lucid.
Airtable Forms is a great tool to achieve this. It is intuitive, user-friendly, and can refine how you use forms. In this article, we understand Airtable forms and how you can create them.
What are Airtable Forms?
Airtable Forms helps you collect information from individuals through polls, surveys, application forms, feedback forms, and event RSVPs. It creates a structured system to collect consistent data from anyone. It enables you to derive conclusive inferences and action items.
You can customize these forms to meet your requirements and change their style to align with your brand. These forms integrate seamlessly into your workflow and automatically populate data on any base. They have a responsive design, making them accessible from any device.
How to Create Airtable Forms?
Airtable forms help sales, marketing, and even the human resource department. It helps collect quality information and drive decision-making. Here are the steps you can follow to create an Airtable form:
Step 1: Create a form
To create a form in Airtable, begin with a table to populate the collected data. You can make the table from scratch or import it from Google Sheets or elsewhere. Expand the view sidebar and select Form + under Create a View.
Forms on Airtable are automatically created based on the fields added to the table. Ensure you match rich field types to the information you want to collect. For example, capture names with text fields or images with attachment fields. You can also add additional fields using + Add a Field in the form builder.
Step 2: Customize your form
Airtable allows you to customize everything from the appearance of the form to conditional form fields. Keep the form simple, clear, and easy to navigate to ensure individuals can fill it.
Here are some of the customization actions that you can use while structuring the form:
- Custom field names: Make the form more engaging by updating the field header with a question or statement that is easy to comprehend.
- Conditional form fields: Toggle on the Show field only when conditions are met to display information based on the answers submitted by an individual.
- Required fields: Ensure individuals fill crucial fields by enabling the toggle next to Required in the upper right corner. A red asterisk ensures individuals fill these fields before submitting the form.
- Rearrange form fields: Change the order in which the form field appears by selecting the drag handle next to the field name and moving it above or below other fields.
- Hide a field: Remove irrelevant fields from the form by clicking the field name and dragging it to the left of the screen.
Airtable allows you to add your brand identity to the form. Click anywhere in the header next to Add a cover image, and upload a desired image. You can also add your brand logo by selecting Add a logo and uploading the image to the dialog box.
Step 3: Customize post-submission settings
Once an individual submits a form, you can customize their experience. You can configure the form to display a custom message or redirect them to a custom URL. Moreover, you can set up an email notification to your inbox after every form submission. Navigate to the bottom of the form and toggle on the action to meet your requirements.
Step 4: Test the form
Before you send out your form to the desired target audience, ensure it functions properly. Navigate to the Open form in the upper left corner to view it as any individual would. Test the various fields and ensure that any conditional form fields respond correctly.
Step 5: Share the form
Once you create and test the form, it is time to share it with your target audience. You could use it for external surveys or circulate it internally to understand employee sentiments.
Navigate to the view bar and select Share form from the top left corner. It generates a unique URL that you can copy and send to anyone.
If your form contains sensitive information, a Pro or Enterprise Airtable plan allows you to add a password or set access to a specific email domain. It adds an extra layer of protection that ensures the information you collect is from the appropriate source and is confidential.
Step 6: Organize and review submissions
Any time an individual fills out a form, their details appear on the table in real time. Take immediate action on the forms by updating their status field or using a filtered view for specific submissions.
Final word
Airtable is a powerful tool that simplifies collecting, storing, and retrieving information. The form view helps in the systematic management of assets and gathering information. Moreover, these forms can be easily embedded into your website, enhancing their accessibility.
Creating complex Airtable forms with multiple sections and conditional fields may seem daunting. Luckily, we specialize in it and can help you set it up in no time. Drop us a message to get started.
We're here to help!
Button TextFAQ
Editorial Team
Publisher
Subscribe to Seattle New Media Newsletter
Editorial Team
Publisher
Get the File Now
If you'd like to download the file, enter your name and email below, and we'll send it directly to your inbox.
The file has been sent to your email. Please check your inbox!


.webp)

.webp)


Hi, I'm Mike!
If you are enjoying the article, feel free to subscribe to our monthly newsletter.
If you have any project requirements, please contact us.


